Master the Knight's Tour
Learn how to solve this classic chess puzzle
What is the Knight's Tour?
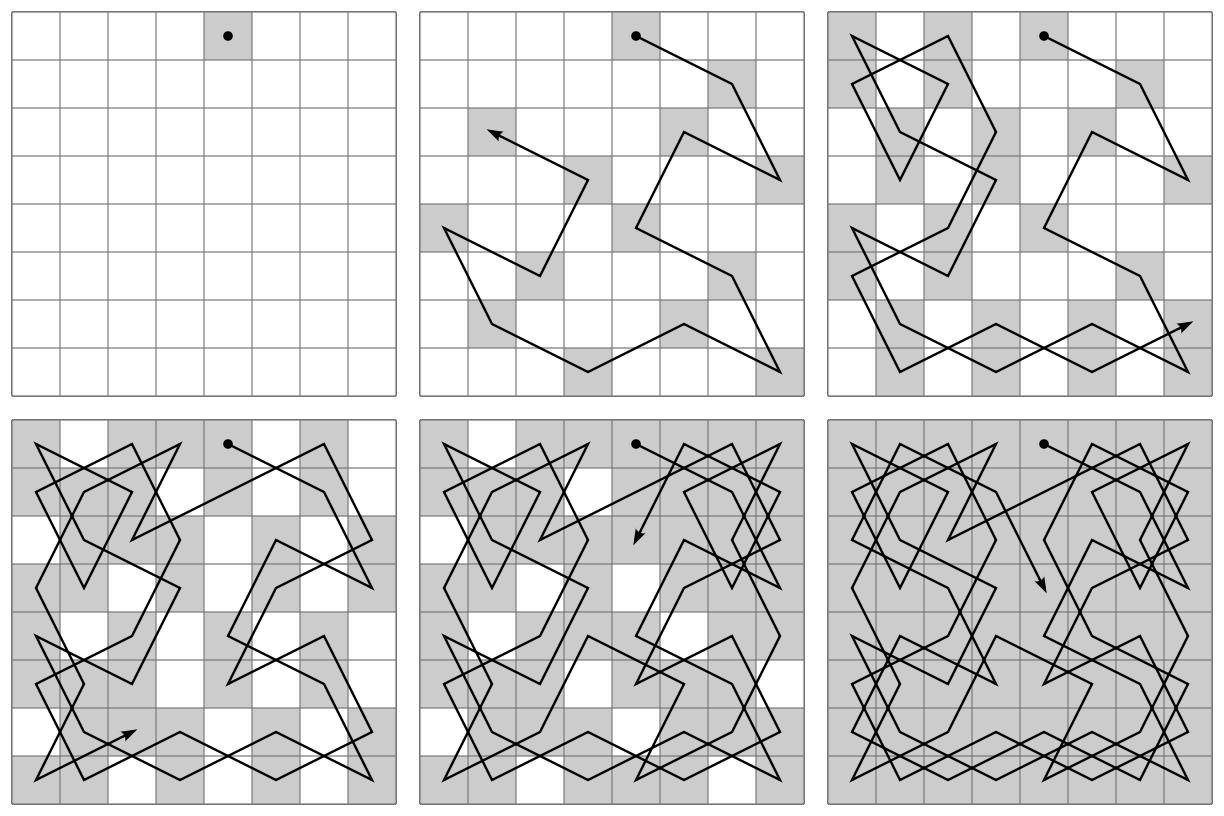
The Knight's Tour is a famous chess puzzle.
The object is to move the Knight around the board using only valid L-shaped Knight moves, so that each square is visited exactly once.
The puzzle is believed date back at least to the 9th Century CE and is first described by the Kashmiri poet Rudrata.
Scroll down this page for tutorials on how to complete the Knight's Tour from any starting square. We even teach an advanced method where both the starting and end squares can be freely chosen!
You can also practice and test yourself with our interactive training app (no download needed).
Learning the Basic Knight's Tour
Solving the puzzle may seem impossible, but by following a few simple rules you will soon learn how to complete the tour speedily and with ease. Your friends will be amazed at your mental powers!
The method taught here was originally published in 1840 by Peter Mark Roget (famous for Roget's Thesaurus).
Quadrants and Systems
First you have to familiarise yourself with the Four Quadrants of the chess board, and with the Four Systems of moves.
The Four Quadrants
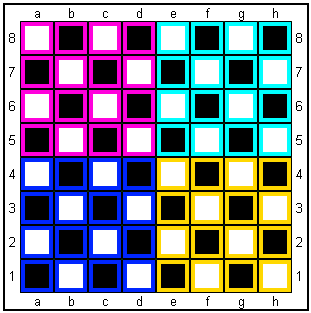
The Four Quadrants are shown here using different colors for each quadrant.
The Four Quadrants
The Four Systems
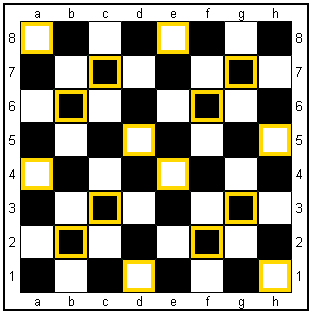
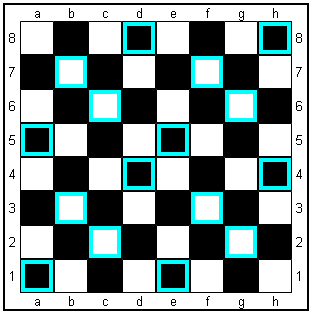
There are two diamond-shaped systems and two square-shaped systems. The shape is repeated in each quadrant, collectively forming all the moves for that particular system.
For each shape (diamond or square) there are two orientations, a left-hand shape and a right-hand shape.
The left-hand diamonds point up to the left, whereas the right-hand diamonds point up to the right.
The left-hand square has the topmost square on the left side of the quadrant, whereas the right-hand square has the topmost square on the right side of the quadrant.
The Four Systems are shown in the following illustrations.
Left-Hand Diamond System
Right-Hand Diamond System
Left-Hand Square System
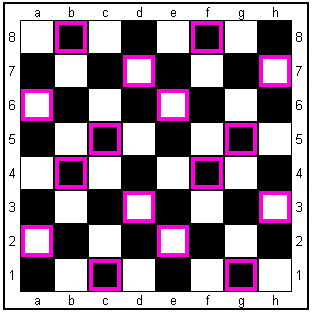
Right-Hand Square System
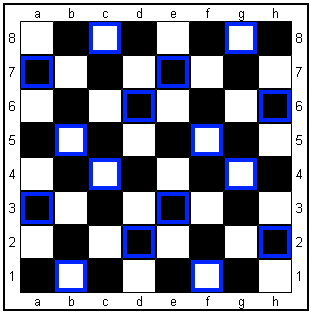
How to Complete the Basic Knight's Tour
Once you understand the quadrants and systems, completing the Knight's Tour is child's play.
First, you simply note which system the Knight occupies on its opening move. Then move the Knight around the other three squares of this system within the same quadrant before moving on to do the same in the next quadrant.
All you have to worry about is that the final move in each quadrant allows you to move on to the same system in the another quadrant. To do this, you need to decide whether to move clockwise or anti-clockwise around each quadrant so that you don't get trapped on your final move. As long as you make sure that your final move in each quadrant is as near the center of the board as possible, you will be OK.
When you move into the final quadrant of the system, you must choose your direction of movement carefully to ensure that the final move in that quadrant allows you to move on to another system. You then simply repeat this procedure through the second system, before moving on to the third and finally the fourth system, until you have fully completed the Knight's Tour!
You should note that the four systems are completed in a particular sequence. A diamond-shaped system must be followed by one of the square-shaped systems, and vice versa.
Learning the Advanced Knight's Tour
With the Basic Knight's Tour, the starting square is chosen, but the tour may end on any square. The Advanced Knight's Tour goes one step further as you are also challenged to end on a specific square!
Sound impossible? Not if you follow the simple rules given here. Learn this procedure and your friends will be truly astounded at your mental powers!
Note: You should make sure that you fully understand the principles of the Basic Knight's Tour, and have practiced the method until you can complete the tour quickly and easily, before you attempt to learn the advanced method described here.
Start and End Squares
The procedure for completing the Advanced Knight's Tour is similar to the Basic Tour, but requires some adjustments to the way in which moves are made from one system to the next.
First, when selecting the start and end squares, you should realize that these must be opposite colors or else the Knight's Tour is impossible. In other words, if the start square is white, the end square must be black, and vice versa.
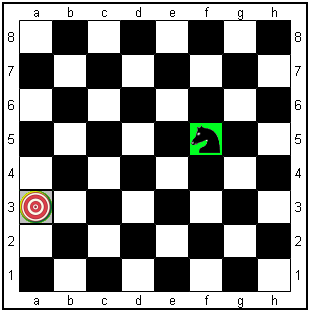
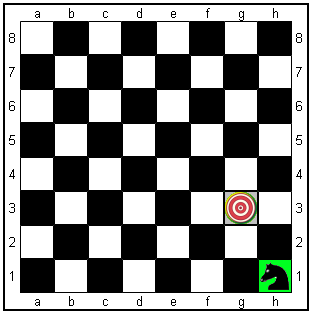
Once valid start and end squares have been selected, you should note which systems they are in. There are various possibilities, as shown below (the Knight is on the start square, the target on the chosen end square).
Opposite Shape (Square-Diamond)
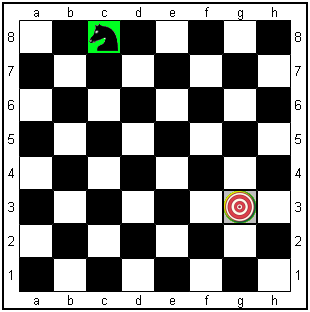
Same Shape, Opposite Orientation
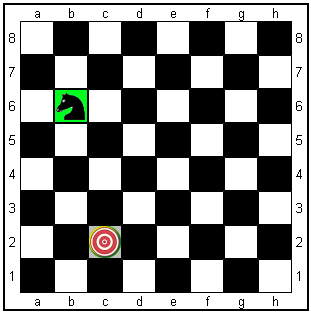
Same Shape and Orientation (Same System)
Same System and Same Quadrant
How to Complete the Advanced Knight's Tour
Opposite Shapes
For example, the start square is in a square-shaped system and the end square is in a diamond-shaped system (or vice versa).
This is the easiest of the various problems to solve.
First you should complete the first system as with the Basic Tour, but in the final quadrant you must select your direction of movement so that you can enter the opposite-shaped system that is NOT the system occupied by the end square For example, if the end square is in the left-hand diamond system, you must enter the right-hand diamond as the second system. Then complete the second and third systems as normal, making sure that you can enter the final system withour hitting the end square..
Completing the final system requires you to plan a route through the remaining squares so that you can finish on the end square. Depending on where you enter the final system, this may mean that you have to move from one quadrant to another without having completed all its squares. There are no hard-and-fast rules for this. You must learn to SEE the route. To do this, you will need to practice!!!
Same Shape, Opposite Orientation
For example, the start square may be in the left diamond system and the end square in the right diamond system.
This one is a little trickier, but learning to solve it will teach you an important principle.
First you should complete the first and second systems as usual, making sure that you can enter the third system (which contains the target) on a vacant square.
Now you have to move out of the third system and into the next system as soon as you safely can! Certainly you should move out before you complete the first quadrant of this system..To ensure that you move out safely, you need to check that the remaining squares in that quadrant allow you to move both IN and OUT of the quadrant from adjacent quadrant(s) of the same system when you return to it later. This is vital, or else you will get trapped. Depending on the third system, and the position in which you enteredl its first quadrant, you may be able to leave three, two or only one of the squares in that quadrant. Practice will teach you what is needed.
Once you have moved out of the third system, you should complete the new system in the normal way, making sure that you are able to enter back into the system containing the end square from your final move
Finally you need to plan your route through the remaining squares so that you finish on the end square. Again you will need to practice the tours until you learn to SEE these paths.
Same Shape, Same Orientation (Same System)
For example, both start and end squares are in the right square systems.
Here you must move out of the first system (which contains the target square) as soon as you safely can! As in the previous case, you should move out before you complete the first quadrant of this system, checking as you do so that the remaining squares in that quadrant allow you to move both IN and OUT of the quadrant from adjacent quadrant(s) of the same system when you return to it later. If you don't do this, you will get trapped. Depending on the third system, and the position occupied by the start square, you may be able to leave three, two or only one of the squares in the initial quadrant. Practice will teach you what is needed.
Having moved out from the first system, you complete the next three systems as normal before re-entering the first system.
Finally you again need to plan your route through the remaining squares so that you finish on the end square.
Same System and Same Quadrant
For example, both start and end squares are in the left diamond system and also both in the lower right quadrant.
Solving this tour is basically identical to the previous case, except that you just need to ensure that you can enter the final quadrant (which contains the end square) and finish on the target.


Knight's Tour Trainer
by Psychic Science
This is PREMIUM content
You may be asked to view
a short ad to unlock the app
Select Knight's Tour Challenge
Basic
Random Start
Choose StartAdvanced
Random Start & End
Choose Start & End
Learn and Practice the Knight's Tour Challenge
a b c d e f g h 8 


8 7 


7 6 


6 5 


5 4 


4 3 


3 2 


2 1 


1 a b c d e f g h
Show Systems
Left Diamond
Right Diamond
Left Square
Right Square
Show Quadrants
Upper Left
Upper Right
Lower Left
Lower Right
